As mentioned before i am attending my first tournament in early June this year, and to prepare for the tournament i ma currently adding as many vehicles that i can without compromising what i consider quality of my painting. To that end i've wanted to add a Whirlwind scorpius.
So what differs a Scorpius from the standard 40k version i hear the sonorous crickets residing in my blogosphere chant.
Well with 36" S6 AP3 blast, ordnance we are off to a decent start, furthermore, if i stand still with it, i instead get to shoot 1+d3 blasts due to the rocket barrage rule.
Now even though i intend to go with a vehicle heavy list and specialize on Anti tank, and with my team mate carrying a lion share of the anti infantry duty, it would still be remiss of me if i did not consider the theme of my army, and i can't see a self contained unit of my 108'th going on kill missions without someway of clearing out all that infantry that will stagger out of the smoking wrecks of all the tanks i hope to shoot out, it will also give me a slightly better way of managing hordes.
So here goes.
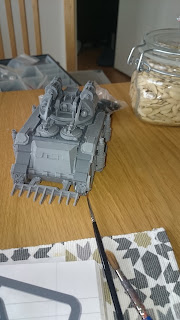
Two weeks ago i built the kit in it's entirety, it is a pretty easy one to build, if you'v ever built a deimos pattern rhino you more or less know what to expect, with the purchase of my new heat gun the two weeks hence i had a new way of easily remedying any potential resin warp. So after gluing my fingers together ONLY twice, this is where we are
I then broke out ye' olde' airbrush and kicked off with a simply layer of vallejo air black, and then went to town with my Vallejo acryllic metall. Two thin coats and easy peasy here we are
 |
| simple masking tape works for me |
i then taped the tracks and all details i wanted to remain a plain gun detail, like the tracks, the turrets and such. The i did two thin coats of Calth blue form FW, and did some quick shading with nuln black gloss. I also did some copper details with vallejo copper.
Now, for me, i always take the airbrush apart after my acryllics, and put it into my Ultra sonic cleaner before doing clears, as the metall pigments have a risk of clogging it otherwise
 |
Nearing completion
|
To differentiate pure "support" tanks, as opposed to my "assault" tanks i decided to freehand a simple black stripe on the front, and leave the skirts unpainted, as opposed to my predators where i have black skirts and a clear front.
 |
| added some unbroken chains transfers on the turret, just for the effect |
Well, unlike my other tanks i have as of yet to decide if i am going to chip these tanks or not, i probably will, but for now it feels nice to have an untouched one :D
What is everyone else up to?


Inga kommentarer:
Skicka en kommentar