onsdag 5 oktober 2016

Veteran rhinos for My alpha legion 108'th navigationary expedition

Phew 


This is a post for my Veterans rhinos, and just a quick note regarding color choices and alterations


Now something that is applicable for all my rhinos so far is that i've used Mars pattern Rhinos. Now i know that there is some confusion regarding the fact that the "40K main rhino" isn't allowed to be played /even fukken existed in the thirtieth millennium. But as a matter of fact these not only exists, but was used during the Great crusade, the only issue is that while it is an easy enough vehicle to mass-produce, it is not as wide-spread nor as commonly replicated during the Horus heresy, since Mars is in a bit of an uproar due to some Horus feller.


point in case. This is from Horus heresy extermination 
Meaning that depending on your fluff for "your guys" it might not make the most sense that they have ready access to a vehicle that is not really in production. Now for fluff reasons i'm relying heavily on the book three annotation mentioning that the AL had been in the field and actually doing undocumented work (assumed to be work that the emperor kept out of even the jaded annals of the great crusade) and as such would have had access to a lot of experimental/ not widely disseminated materials. 

Now, crunch reasons i would rather have used the Deimos pattern, as i think it looks a tad beter but also conveys the proper feeling of the HH experience. But, honestly, i had two Chaos rhinos lying around ,and i wanted to try out my scheme. 

Now for both of the rhinos so far (and planned for the upcoming ones as well) I am using Forgeworlds Pintel mounted weapons set  as well as the Alpha legion Rhino door as i think that they make even the humble mars pattern rhino look spectacular. I actually bought quite a few of the latter, as i will use the hatch on my Predators as well ,and the doors can go to Deimos rhinos in the future. 

I am also using the Alpha legion decal sheet which are, as i might have previously mentioned, simply. The shit. I will be using them to show squad= rhino markings as well as pimping the top hatches and the rear ramps. For no other reason than that i like it. 

I also tried doing some gentle sponge chipping for the first time, meaning that i took sponge blister and dipped the edge in Leadbelcher, and then gently traced areas with that. Something i quickly learned was that you want to follow natural edges (hatches, thread bottoms, doors) as it gives the best result there, and on larger surfaces it just looks splotchy. I can also say that the effect looks absolutely best on black. So IH players rejoice once more. Except....for the whole......Pricmarch thing *cough*

moving on! 

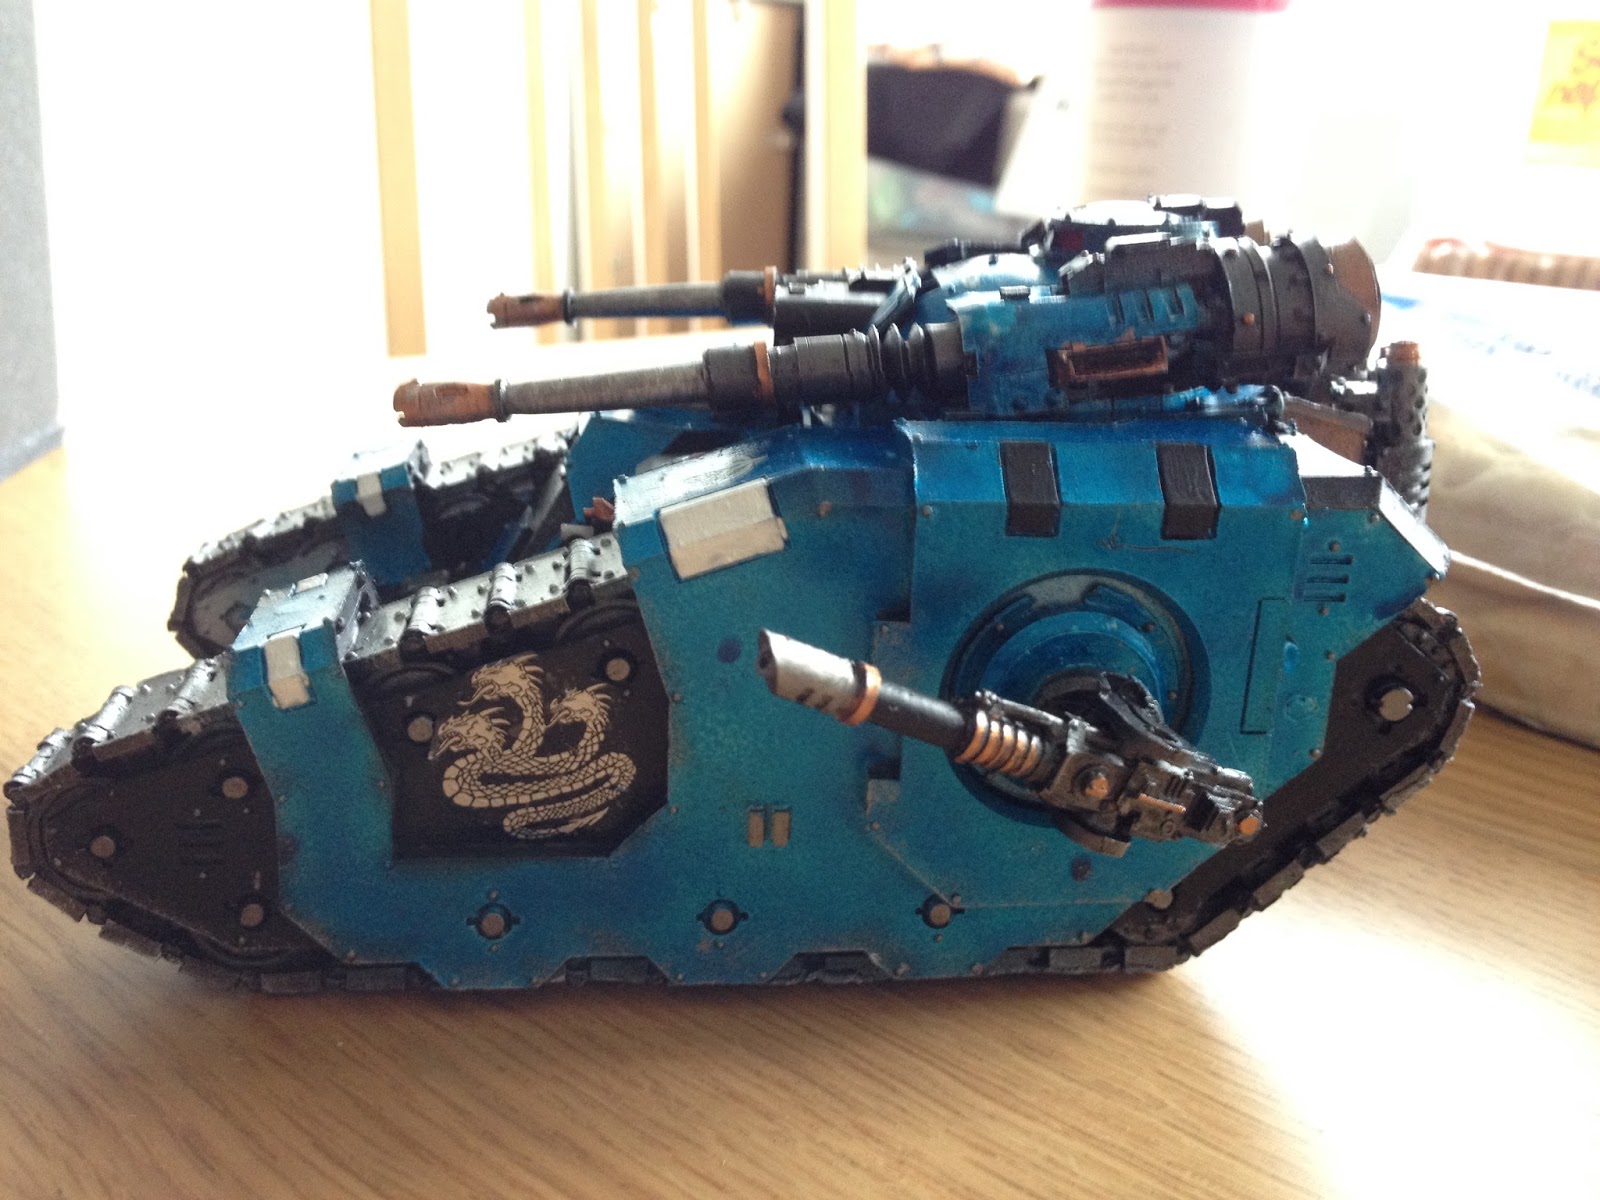
For front plates and doors I've intentionally gone for a darker color (with skipping silver and just doing black= leadbelcher= layers of clear blue) so as to get some contrast. This was actually also an experiment on my behalf, but i think it actually turned out pretty well. 

looking at the rhinos themselves 


So here i actually added a gunner for my HB sponsoon as i though it looked neat. And the VET squad itself will also have two HB, so i get a good narrative theme going immediately.  Further more this one has damage to the tracks, speaking of a shitty history in rolls....

really happy with the transfer. These look GREAT. Thanks FW- 

And here i want to document some mistakes i need to rectify. 
Looking above i want to point at the sponge chipping mistake i did. In my mind it looks pretty good at the edges and around the hatch, but looking at the smoke stack on the right, and the bottom of the same stack you can see some areas that just look like random sponging. So this is where i need to amend it.


like i was talking about the rear ramp


And on this one i simply had the sponson hatch be kept open, indicating someone coming to man the gun, or bailing from a vehicle soon to be abandon'd


So those are my rhinos so far, mainly for my vets, but i have another one for my destroyers about 50% done, and i want to get at least two more going.

Seriously, those FW gubbins are great, if you take something away from this look at them.

Hydra dominatus y'all

söndag 2 oktober 2016

Elder Mieza of the 108'th navigationary expedition


Featured here is the elusive "elder Mieza" a former centurion of the 108'th, he has been registered as participating both in the "The stalwarts" actions in the Rangdan xenocides, as well as their subduing of the laputan technocracy, and the bloody withdrawal at the burning of balbibarbi. More vexing is his reputed destruction at all of these events, as well as his reported sighting at several other critical junctures for the 108'th.


Did some touch up in time for the group photo. 
Mieza, long before being formally acknowledged with the cognomen that in later parts of the great crusade came to define him as a teacher of the 108'th was a centurion assured with the great honor of infiltrating key positions long in advance of the main imperial force, lying in wait for weeks or months at an end, while still remaining at the ready to strike with a moments notice might seem like a natural parts of his particular legions modus operandi, but as he would be quick to point out it was, like all facets of war. An art that one either had the inclination for, or lacked. 

As a vigilator Mieza had a long and distinguished career for the 108'th, serving as a skirmishing and guerilla elements. Fading into the background white noise of combat, only to reappear at critical junctures to serve his legion with fist and plasma. 

long after his internment Mieza would still offer his wisdom and relish the possibility of once more serving in ambushades. Now showing a clear inclination for unorthodox warcraft and an unerring choice of weaponry particularly well suited for eliminating Astartes foes, we must in retrospect wonder at the accident that placed him in place to act with such unerring precision against his loyalist brethren. 


I have to say, of all the legion special sculpted units I've done so far( one) this jas to be my favorite. The iconic hydra and all the loving details shaped in this kit is just a wonder to bring out with silver, and the extra detail on the knee joints are a great chance to do some lifting out on. The pose is my attempt at trying to emulate the one on the FW homepage, and the base is snowed and bare, so that i can add  some trophies if he serves well. 

I actually used him in the two matches i've played, and so far, has served with distinction. He has a kill tally of 18 marines thus far (sweeping advancing a squad of IW) and the flamer and plasma cannon is expected to serve in ZM as well. I've no doubt that Mieza will rise again. 


Hydra dominatus y'all 

A ride worthy of a Herald of Nurgle/ How to do a quick palanquin of Nurgle


I wanna build a palanquin of nurgle


That was more or less how my discussion with my veteran friend went, now he was sure that there was a model available. I mean, there is one for a herald of Slaanesh ( a fiend) and one for a nurgle of tzeentech and Khorne ( disc and juggernaut respectively) so why isn't there one for Nurgle? he said that epidemicus is sufficient, but i pointed out that two out of four ( no naughty for nonnie Slaanesh) had Named characters (blue scribes and headtaker) where both easily done, and STILL had a riding model available. So this should be remedied. And that was why i took it upon myself to build one. And tell others of how i did it. 

Now, to start with, i am a better painter than modeller. And i am not a great painter. So if  you have better ideas, and know what to do. Shoo, out you go. But if you want some inspiration. Here we go. 

You will need 

  1. 60 MM round base or equivalent (Since the modell is very bulky it seems sporting to me, but 40 is probably sufficient. As long as you don't droop over the edge) 
  2. A razorback hatch (or an old Rhino RB combo hatch or pred hatch or whatever) preferably with the "middle" sprue still in the hole. Otherwise you can cut a sprue length to the bottom of the hole (flat with no detail) to straddle the hole. We'll get to the why later
  3. some assorted nurglings, from either the nurgling pack. Or the plaguebearer pack, 
  4. A rhino side door. 
  5. Some nurgle decorations (plaguebearer kit or rotbearers) 
  6. Leadbelcher, typhus corrosion and ryza rust. As well as some decent copper and Nikilakh oxide. 

And that is it. Assembled mostly below. 


disregard the top hatch in the top right corner.


Now, first off. Paint the Nurglings in the appropriate color and do some basing details. I know that is usually what we do last. But this is gonna be harder later. 

Then place the nurglings around the plate making sure that they are seen at the edges, but also have some in the middle so as to even out balance.

look at it from the side to make sure there is approximately an even height to them

Now, Paint all the rhino parts in leadbelcher, when dried add a LOT of typhus corrosion. Let dry. Seriously. Do that. Now, get out your dry-brush. And start dry-brushing Ryza rust all over it. The en-tropic presence of nurgle does it's magic work. 
NOTE: i know this is the "official" GW way of doing rust. But hot-diggity-damn! it looks real good with a minimum of effort. 

Now paint all the nurgle details and offerings in Copper. or leadbelcher and dry brush copper. Then add some nihilakh Oxide. Let pool around the three ringed details. And see hotdog comment above. 

Now. Take the rhino side door. And glue to one of the short sides of the hatch. Letting it stand up, reminding you of a particularly lonesome tombstone commemorating someone who felt the gleefull joy of papa nurgles bounty. Add the nurgle details around the Hatch. And attach glue to the hands, feet, and upward facing butts of the Nurglings. Then attach the hatch on top of them. 

As such

let it dry. TRUST ME.


Now. Here's the reason we had a cut off sprue in the hole. Provided you used the RB hatch, and the there is a sprue in there. Your herald will stand properly, without wobbling, and pointing with scorn at the enemies of the father. 

as such

To the right, no, the OTHER right. O for nurgles sake. Just go forward. 
Meaning that you have a quick and good Palanquin ready to play. It takes about an hour or two to do. Can be readily repeated. And costs less than five bucks.

here he is a with a squad of plaguebeareres and a rotting sergeant. 


SO there you are bob's you uncle. And now we have a good way of doing rust as well. 

How does anyone else do their palanquin?

Hydra dominatus y'all. 


painting a forge world sicaran for my alpha legion

wooof!

it's been a while since i sat down and actually blogged some about what I've been up to and what I've had on my painting desk (a glorified name for the joint kitchen area that my family share) well i could blame the move or me taking a stab at getting better at the parenting role, and alleviating somr of my partners responsibilities in the home. But mostly i have just had to choose to either put aside time to blog, or putting aside some time to get down to painting. And occasionally neglecting both to put some time into the Witcher III (witchiester-est of the games) / working myself into an early grave. But i s'pose balance is the key. To what i do not know, but as a literal minded person i assume it is to some legendary chest giving me more time to paint. IE crack.

But still. i'm going to actually share my first "real" tank painted. And the first tank i can honestly say that i look at and go "yeah, that's alright".  Which, as anyone who has painted for more than a forthnight, and who has had the time to look around a bit, can tell you. Is actually something of a hard thing to do.

The thing is, i usually look at a finished product and think. This needs another layer of shade, this needs a steadier highligh, this needs scrapping and going back to basics. But one of the reasons i picked AL for my 30k Army was that i wanted to up my game in painting. It was, to that date, my third power armored army,  and i was getting real tired at cranking out models. Which i needed to do to play my more experienced buddies. Not because any of them gave me flakk for putting up unpainted greys, or half finished models. But because it felt like a shame for deploying unfinished armies when they had so much greatness deployed, and it REALLY detracted from the immersion. Which scratches some fluff. And we are more of fluff players, all of us.

Now the reasons above, as well as the fact that resin heroin is more expensive and as such i am reduced to purchase it at a lower rate. I wanted to try new techniques and get better stuff on the table, as such i have tried new techniques, such as sponge chipping, soot effects and realistics metals, and am really happy for doing it. I have also tried getting better at transfers, and the FW transfers are no joke. I have only really tried the Alpha legion ones. But they are Toight. And i will wholeheartedly reccommend them to anyone.

but still. Moving on to my Siccarian tank.


 First off, the actual kit. Now putting it together was a bit harder than i thought, and certainly took more glue than expected. The only advice i can give for the actualy Chassis is that you get some rubber bands to make sure it "fuses" correctly. Otherwise, you can do what i did. And Put it on it's side. Making sure there is a book on each side to make sure it remains standing. So for the pic above you are missing a track side on either part. And that is what i reccommend putting on it's side.

This is what you end up. Now, i would reccommend not gluing the
- Turret
- Sponsoons
- Heavy bolter

As they all need more attention and love, and the turret is stable enough to actually sit well when not glued in place.


Now the next two parts actually involve a jump cut. So far i've done a basecoat of Vallejo black primer airbrushes. And then added a simple coat of "vallejo acryllic metal color"  .Now, this is just ONE coat, and i can tell you. It is a delight to work with frankly. There is no clogging of the brush. No metallic residue dripping, and no flow control issues. You get an even, good and realistic color for vehicles. I have, so far only tried two (copper and gun metal) but both of these are GREAT starter paints for anyone, and i can't even imagine what a pro could do with them. 

same for the turret above. I then taped the tracks, and the barrels. As i found the gritty gun metal a great color for both of these places. It is simple marker tapes.

Now for the jumpcut. The only reason i bought these two colors (for about 10 Euros all in all for both) was that the local insistent retailer, was rather convincing in effacing their efficiency. By all accounts he did military modelling. And what he lacked in social skills me more than made up for in knowledge about military vehicular painting. So with that in mind i bought these two

love in a bottle for good prices
And went to town.

Now the next step is going over the chassi, the turret and other select parts with Vallejos air silver. And then giving it two light coats of Calth blue form Forgeworld. I've just recently nutted up and gotten the actual FW colors. And AGAIN. Let me tell you. Deh-liiiight.

After that i used the acryllic copper for the back of the turret gun, and the front of the barrels. And then did a highlight with heshtut copper.


Which resulted in this


Pretty nice so far i think. And now on to the details.

If this little project has taught me anything. It is that you really need to make time for details. I estimated about three hours. Which was a bit light. In reality i needed about six to get into fine detail work.

But first i did the following parts in leadbelcher
- Rivets
-Hatches
- Joints and seams
- Metal protrusions.

Following into doing two thinned coats of abaddon black on

- Sides of the frontal glacial plate
- back striping
- Front of the glacis
 - Sides of the threads
 

And then some simple white on chosen markings. 

The rationale of the black is to break out certain parts and make it catches the eye to them. As well as giving some background for those sweet, sweeeet transfers. The rationale for white is to denote a command color for my sicarian. As it will serve as a command tank in my tank lists. And i want my opponents to readily be able to distinguish them from ordinary tanks. 

The i finished with doing some red for lenses on the turret, shading copper and metal parts and fastening the HB and sponsoons. After which i did some light sponge chipping, and adding transfers. 


The end product is as follows. 


All in all, i am super happy with this piece. 


Hydra dominatus y'all.